Stop Updating Your Android Once Lost Precious Data
If your Android data is lost, stop adding or deleting any data of your
Android. If not, your Android data will be overwritten. That is, all
your lost data cannot come back to you any more. So, make sure not to
update your Android as long as your data get lost.
Step 2
Download Dr fone HERE on your PC Run the Android Data Recovery
Install the program on your computer and run it, you will be asked to connect your Android device to PC via USB.
Step 3 Set up Android to enable USB debugging
After connecting your Android to the computer, go to the step 2 -
Enable USB debugging. Here you have three ways to do it according to
different Android OS version:
1) For Android 2.3 or earlier: Enter "Settings" < Click "Applications" < Click "Development" < Check "USB debugging"
2) For Android 3.0 to 4.1: Enter "Settings" < Click "Developer options" < Check "USB debugging"
3) For Android 4.2 or newer: Enter "Settings" <
Click "About Phone" < Tap "Build number" for several times until
getting a note "You are under developer mode" < Back to "Settings"
< Click "Developer options" < Check "USB debugging"
In the latest version of Android Data Recovery, you are empowered to selectively choose which type of files to be scanned. If you want to
recover all type of files, you can just skip it and move on.
Besides, you are also allowed to recover only the deleted data or to recover all the data. Choose a storage scanning mode:
Step 4 Start scanning your Android for deleted files
Once you enabling USB debugging for your Android, it will be detected by the program. Then click on the green button "Start" to anaylize your Android data.
When you see the window below, it is time for you moving to your Android device again, tap on the "Allow" icon, then turn back to the computer and click on the "Start" button to continute.
Step 5 Preview and recover contacts, messages, photos and video from Android
As you can see, this Android Data Recovery can recover data including text messages, contacts, photos and videos from your Android device. But you can only preview messages, contacts and photos now.
At the last step, check and mark those you want and click "Recover" to save them to your computer.
Step 6 Back up Your Android Device to Protect the Files Do back up with your Android device
from time to time. Therefore, you don't need to worry about losing data
and then have no way to recover them. Later that day, if your Android
data get lost, you can restore your deleted Android data back from the previous backup with Android Data Recovery. You can try Android Transfer, which allows you to back up your Android phone easily.
Perfectly done. Android Data Recovery
help you restore all lost text messages, contacts, photos and videos
back on your computer in above four steps. In the near future, you
should learn to back up all Android data to computer so that you can find them back once you lose them again.
UnlockMTN, AIRTEL, & ETISALT Huawei E303, E173 USB Modem popularly sold in the market today I
have already posted an article how to unlock Huawei modems easily by
generating the unlock code on this site using the IMEI but this doesn’t
work with newer versions of Huawei modems like E303 etc. This method
doesn’t seem to work with the Huawei E303 being issued by Nigerian
networks like MTN, GLO and Airtel over the last few months. Though I
have an older version, like Huawei E173, which I easily unlocked without
any complications, I was forced to unlock my MTN Huawei E303 modem
which I later succeeded to unlock by using DC Unlocker. It’s an MTN
modem and none of my existing softwares worked, I bought some credit
from DC Unlocker. Unlocking it isn’t hard so far you know the right
steps to follow. just download the dc unlocker by sending your email address to my email address gbafem93@gmail.com which the DC UNLOCKER will be attached to the email sent to you.Run the software. Be sure you close the default dashboard software for your modem. -
Select your device model from the drop-down menu and then click on the
magnifying glass icon to allow the program detect your device
- Now click Server and enter your username and password under login options, click on check login. You must Connect your PC to internet by use of phone via external gateway or nokia PC suit.[Important!!!] NOTE: The essence of doing so is to to be able to access DC-Unlocker server to confirm your account credit. Remember,
you cannot plug two Modems on one PC at a time. Make use of phone as a
modem in order to connect(use PC Suite or bluetooth gateway) your PC to
DC-Unlocker server.
- With that in place, select Unlocking and simply hit the “Do job” button.
- As shown above, the modem was unlocked successfully. You
can now use any SIM on your Huawei E303 modem. You can as well use this
method to unlock any other USB modem so far it’s supported by the
unlocker. If you’re using other old ZTE or Huawei modem, you can unlock
the modem for free if you check this post. Also, if you’re in Nigeria
and don not have a PayPal account since it’s unsupported here, you can
contact me personally and I can purchase the credit on your behalf. For Quick Payment Send me a PM or call: 07053705671 If you have questions, you can let me know by replying below. Enjoy...
TrueCaller is the global mobile
community, were it has a huge database of contact details of contact
numbers. The users can share their contact list to the truecaller
database to make the contact details visible to anybody. In this case,
if you are one of the contact in your friend’s contact list and he
shared the details to truecaller database, then your contact details
will be visible to anyone globally. But if you want to remove your
contact details from the truecaller database due to some privacy, it is
possible now. Lets see the how to steps.
How To Steps:
Two ways are there t remove your number from the database either by TrueCaller App or by TrueCaller Online.
1. In the mobile app itself you can see “Deactivate Account” option. You can remove your number by deactivating through mobile apps.
2. Or Open TrueCaller website and login to your account, now navigate to the trueCaller Unlistpage.
3. Enter the mobile number with your country code and enter the
verification code shown, then hit “Unlist”. Now your number will be
removed the database.
Note : You cannot resubmit your number to the directory once it is removed from the database.
URL shortening is a technique which makes the tiny URL
and still points to the required page of WWW. Short URL’s are becoming
more popular, because it is hard to share the lengthy URL’s in many
places like social media. You can do URL shortening for any length of
URL’s. Short URL’s points to the original URL using the HTTP Redirect
method. You can also make customized short url’s to remember easily.
Many short URL providers are available in the internet, you can make
short URL’s for any web links for free. Some of the popular short url
service providers are Goo.gl, Bitly, tinyURL.
Due to emerging raise of short URL’s many of use not caring of the
original URL’s. Also sometimes the short URL’s may link to many
advertisers. To avoid these situations before clinking to the short URL,
just check the original link pointing to the Short URL. How to do
unmask the original url of the short url? I have listed a set of steps
to Unmask the Short URL.
Untiny is an unmask tool developed by JANE. This tool will unmask the original url of the short url’s.
How To Steps:
1. Have your short URL handy and open http://untiny.me/ in your browser.
2. Now paste the short URL in the URL bar and click on “Extract” , this will show you the original URL.
There is no need to go the untiny webpage every time, instead of that
you can directly use the untiny service from the browser address bar. http://untiny.me?url=
Append the tiny URL at the end of the above URL and hit enter. Eg :http://untiny.me/?url=http://goo.gl/fSXaX7 – it will directly load the webpage with unmasked URL. Example :
Checkout the example.
1. I have short linked http://www.t2lead.in and its short URL is http://goo.gl/fSXaX7
2. When i pasted the short URL and extracted the original URL will be displayed. That’s it.
SHAREit is one of the best app to transfer files faster
through WiFi without any network connection. Before we proceed to how to
use and transfer files using this app, checkout the detailed
information like how it works, features, available platforms, price
about the app here.
In this guide i have taken the example of transferring the files
between my android smart phone and windows PC. Same procedure can be
applicable while transferring files for any devices like android to
iPhone, iPhone to windows, etc.,
Requirements :
The devices going to transfer the files must have a WiFi functionality. [Only WiFi, no data connection required]
To begin transferring the files between one device to another, all
you need is SHAREit application installed on both the devices.
How To Steps :
1. Open the App on your Android device and choose “Send” option.
2. Now Choose the files you want to share. Once you selected the files click on “Next”
3. Now the app will search for the nearby SHAREit device [nothing but your PC].
4. Open the shareit app on your PC and click “Receive”.
5. Now your app in the phone will show the nearby device. Tap on the
device from your phone, so that it will start sending the files to your
PC.
You can do the same steps vice-versa to transfer the files from PC to your smart phone.
Hope you like this post. Share it with your friends on social media. Do let me know any doubts/clarifications via comments
Hi Android users, today i have post for you all. In this
post I have listed how to boot your android in safe mode. You all aware
we used to boot windows operating system in safe mode, during critical
situations. Likewise, we can boot android in safe mode too. Lets see the
steps to do so.
How To Steps:
1. Press and Hold the Power on/off button and you will prompted with power off/restart options.
2. Just tap and hold on “Power off” option for few seconds and now you will get an option to reboot your android phone in safe mode, tap “OK”.
3. Now your phone will rebooted in safe mode, you can see the “Safe Mode” text in left bottom screen on your android phone.
To boot again in normal mode, just reboot your phone with normal procedure you usually do. That’s all.
To reformat computer using USB flash drive, Download Windows 98 MS-DOS system files . It is totally free for download. After downloading, extract the zipped file into a folder that you can easily explore.
Install USB Disk Storage Format Tool on your computer. Create a USB flash drive that has a boot sector. Insert the blank USB flash drive and run HP USB Disk Storage Format Tool.
5
On the format tool platform, on the Device tab, select your
flash drive that you want to create as bootable. Makes sure that it is
the right device.This makes it easy to reformat computer using USB flash
drive
6
Go to File System tab, change settings into FAT 32. Under Format Options, check the Create a DOS startup disk option. Click “…” button to browse the folder where you have extracted Windows 98 MS-DOS files earlier. Select the folder and click OK.
7
On the format tool, click START button. A pop-up message will
prompt you before proceeding that data on the drive will be lost. Agree
to continue. Instantly, your bootable USB flash drive is ready. You can
now reformat computer using USB flash drive.reformat computer without
disc
8
Start reformatting your netbook, laptop or desktop computer
using your bootable USB drive.Before turning the computer on, plug in
your bootable USB first then turn on your computer.
9
As the screen display starts, press either Del or F2 or F10 to display BIOS setup. Go to Boot menu. Change Boot order. Make USB flash drive to be on the first boot order.
10
Press F10 on the keyboard to save changes. As the computer restarts, click enter when ask to boot from USB flash drive or wait until the flash drive loads automatically. If you have made a Windows 7 installer on your bootable flash drive,
installation will automatically starts. Installation will take several
minutes. Wait until installation has been completed.
These are the complete steps on how you can reformat computer using USB flash drive.
Windows comes with a variety of ways to rename multiples files at
once from Windows Explorer, the Command Prompt, or PowerShell. Whether
you’re looking for an easy-to-use graphical interface or a powerful
command-line method, you’ll find it here.
The Windows Explorer method is fast, but lacking in flexibility.
PowerShell is extremely flexible – but it can be intimidating if you’re
new to PowerShell. If you’re looking for a powerful graphical interface,
a third-party utility is your best bet.
Windows Explorer
Windows Explorer has a quick, built-in way to rename multiple files at once, although it’s pretty well hidden.
To get started, locate the files you want to rename and place them in
the same folder. Use the columns at the top of the list in details view
to order the files how you’d like them – Windows Explorer will number
the files starting from the top at the list.
Select all the files you want to rename, right-click the first one
and select Rename. Type your desired base file name and press Enter.
Windows Explorer will take your base name and add a number to each
file’s name. This method is good for cleaning up messy names, although
it isn’t very flexible.
Command Prompt
You can use the rename – or ren –
DOS command in a Command Prompt window to rename multiple files at once.
It accepts the wildcard character – * – to match multiple files. The
quickest way to open a Command Prompt window at your desired location is
to hold Shift, right-click in the folder, and select “Open command
window here.”
The most obvious use case for the rename command is changing multiple
file extensions at once – something you can’t do in Windows Explorer.
The following command will rename all .html files in the current folder
to .txt files:
ren *.html *.txt
This command doesn’t offer a lot of power on its own, although it can be integrated into more complex batch scripts.
PowerShell
PowerShell offers much more flexibility for renaming files in a
command-line environment. Using PowerShell, you can pipe the output of
one command – known as a “commandlet” in PowerShell terms — to another
command, just like you can on Linux and other UNIX-like systems.
The two important commands you’ll need are Dir, which lists the files in the current directory, and Rename-Item, which renames an item (a file, in this case). Pipe the output of Dir to Rename-Item and you’re in business.
After you launch PowerShell, use the cd command to enter the
directory containing your files. You should put the files in their own
directory so you don’t accidentally rename other files.
For example, let’s say we don’t want the space character in our file names – we’d rather have an underscore instead.
The following command lists the files in the current directory and
pipes the list to Rename-Item. Rename-Item replaces each space character
with an underscore.
Dir | Rename-Item –NewName { $_.name –replace “ “,”_” }
If you need a powerful way to rename multiple files at once — without
messing with the command line – you’ll want a third-party utility.
Jason Fitzpatrick previously wrote about Bulk Rename Utility,
his favorite. Bulk Rename Utility has a cluttered-looking interface
that exposes the huge amount of options you’d normally achieve with
regular expressions and complicated command-line options.
After installing the tool, navigate to the files you want to rename and select them.
Change some options in one or more of the panels and you’ll see a
preview of your changes appear in the New Name column. For example,
let’s say we want to remove everything but the number and just have
numbered image files. We can set the Remove panel to remove the first 10
characters and the last 1 character.
Click the Rename button to rename the files.
The general process of installing memorymodules, or RAM, in a laptop
is very similar from one brand to another; today, nearly every laptop
design places an access panel on the bottom of the laptop and uses
similarly latching sockets. The description used here is for the Toshiba
Satellite P205 laptop.
You first want to make sure that the laptop has no electrical power and is cool and stable. Take these steps:
Turn off the computer using the Windows shut-down process.
Keep in mind that you lose stored data if you use Sleep or Hibernation mode.
Unplug the AC adapter cable that runs to the laptop.
Why remove the AC adapter and the battery before
installing memory modules? First of all, plugging them in while power is
on could result in damage to the RAM. Secondly, doing any work on a
laptop while power is applied could result in a damaging spark.
Remove the battery.
Disconnect any other cabling to the laptop, including an Ethernet cable or a telephone modem wire.
If the laptop has been running recently, allow it
to cool for about 15 minutes; memory modules can become quite hot when
they are in use.
Locate a small Phillips-head screwdriver.
This is the screwdriver with an X-shaped head.
Place a soft cloth or other protective mat on a desktop.
Turn the laptop over so that its bottom is facing up.
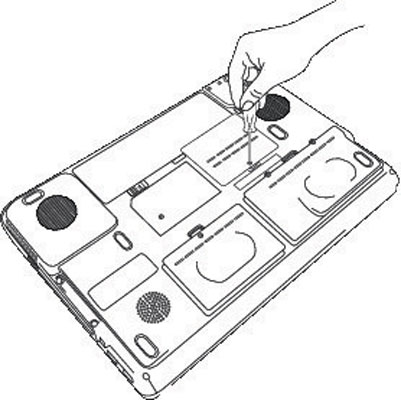
Locate the memory module slot cover.
Credit: Courtesy of Toshiba America, Inc.
The illustration above shows the proper technique for removing the memory module slot cover on the bottom of a laptop.
Carefully remove the screw that holds the cover over the memory compartment.
Hold the screwdriver at a right angle to the
bottom of the laptop and turn the screw carefully; it shouldn’t require a
lot of force to remove. Once the screw is removed, put it in a safe
place. Use a piece of clear tape to attach it to the desktop or the side
of the computer.
Ground yourself before touching the memory module.
Touch any grounded metal surface, like a light stand, or touch the center screw on an electrical outlet.
Carefully remove a new memory module from its packaging.
Avoid touching the connectors; doing so can reduce conductivity because of oils on your finger.
Locate an empty module slot.
If two sockets are in the compartment and the top one is filled and the bottom is empty, remove the top module first.
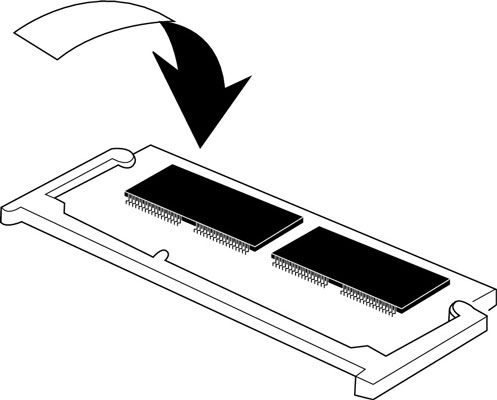
Pick up the memory module by its sides and aim its connectors toward the socket.
Be sure to align the notch in the connector with the matching key in the socket. See the figure below.
Slide the module into place.
Credit: Courtesy of Toshiba America, Inc.
Align the notch in the connector of the memory module with the corresponding key in the socket.
Most sockets align at about a 30-degree angle.
Once the module is fully inserted into the socket, press down on the top edge of the device to latch it into place.
This way it’s flat to the laptop’s bottom. The carrier should snap into place with latches. See the following figure.
Replace the memory compartment cover and lock it down with the screw.
Credit: Courtesy of Toshiba America, Inc.
Gently push the module, in its carrier, back to a flat position on the bottom of the laptop. It should gently latch into place.
Don’t over tighten the screw.
Here’s what you do after installing memory:
Reinstall the main battery.
Turn the laptop right side up.
Reattach the AC adapter cable and other connections.
I know that most all Android users need this, but before I begin I’ll
always advice you make a backup of your current ROM should in case it
get bricked; besides, you have nothing to lose but everything to lose if
it get bricked without you having the Stock Rom back up.
This tutorial will show you how to backup and restore your Android
device before installing custom ROMs, or applying unofficial updates.
And the perfect way to do it is by using the ClockWorkMod Recovery
custom recovery image. With this you can backup the current ROM that is
running on your phone, so in case if something goes wrong while trying
to flash a new ROM into the system you will be able to revert and use
the old software. This is the perfect method to use for avoiding
bricking your smartphone.
How To Backup & Restore you Android device Using ClockWorkMod Recovery
Carefully follow the steps below:
==Make sure your device is rooted before you do this
==Download Rom Manager from Playstore or here
==Run and Install it on your device
==Open it and select the “flash ClockWorkMod Recovery” option.
==Select “Backup Current ROM” and add a file name
==The app will ask you to grant SuperUser Permission. So allow it
==The backup will be completed once you reboot the smartphone.
With the help of this application you can also restore the existing ROM.
You just need to go in Manage and Restore Backup and from there click
on Restore.
Find below the collections of most Tecno Stock ROM (CWM/ MTK) back up for most Tecno Phones.
Collections of Tecno Stock ROMs & Back Up Tecno Q1
Hello all,I saw here
many of our forum members have this problem.So after many goggling i am going to
share a hot thing. you can now change all MTK android phones IMEI no without
PC.
Hello all,i
saw here many of our forum members have this prolem.So after many
googling i am going to share a hot thing. you can now change all MTK
android phones IMEI no without PC.
Change IMEI of MTK Smartphone
For changing the IMEI no you just following this instructions...
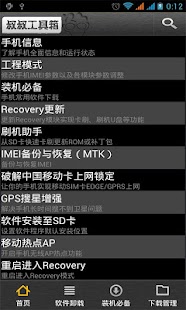
DOWNLOAD Mobile Uncle Tools from Google play store.
Description
Mobileuncle Tools is power tools for MTK android device:1 display device info
2 information of device and running status
3 easy open engineer mode and MTK engineer mode
4 backup IMEI for MTK mobile
5 recovery online update
6 easy update tool via sdcard
7 Enable USB Mass Storage Device,connect cable first
8 crack operator GPRS lock for MTK
9 free the network access limited via GPRS
10 power GPS search
11 Power the gps search satellite ability
12 enable AP
13 easy reboot to recovery
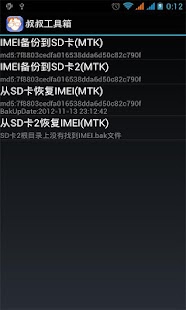
Backup valid IMEI no,
Quote:
Its
really difficult to get for individual, so take copy IMEI no of your
old unused mobile phone, and be sure we will never switch on the phone
ever again. If you switch it on, the both sim will not register to the
network. Its all done….
Instructions
Go to Engineer mode in mobile Uncle tool
Select Engineer mode[MTK]
Go to CDS information
Select Radio Information
Here
you can see Phone1 and Phone2, in that select phone2, because most of
the Chinese clone phone the 1st Sim which is a 3G will work perfectly.
Only the problem happens when we insert the second sim. If you check you
can see the IMEI of 1st sim will start with 35xxxxx and the 2nd will
start with 88xxxxxxxx. That is why the second sim is not able to
register to the network, because its not in international formatted
IMEI. So usually we need to change the IMEI of phone 2.
Select the phone 2
Here you can see a command line with “AT+”. Now just add this command to it AT+EGMR=1,10,”15 digit YOUR NEW IMEI NO” And press “send at command” button.
[ if you want to change the the phone 1 IMEI AT+EGMR=1,7,”NEW IMEI NO”]
Yes we all done… now you can restart the phone and check the IMEI by pressing *#06#
Fortunately enough, root genius only succeeded in rooting Infinix
Zero 1GB/8GB Rom and the other Infinix Zero 2GB/16GB Rom has been
proving unethically stubborn to root. But a rooting kit has been provided below
that will guide you through in easy steps to root you 2GB 16GB Infinix Zero.
Just follow it carefully and I bet, at the end you’ll smile.
What You Need
==>Super Su Updated Download Here
==>SP Recovery Flash Infinix 16+2 Download Here
==> Sp FlashTool v5 Download Here
==>MTK65xx Driver Click Here
==>Your Phone and a Usb Cable Steps Involved..
Follow These Steps Below
==>Step1: Copy the downloaded Super Su to the Root of
your SD Card
==>Step2: Create a new Folder on your Desktop, Name it
“Infinix CWM” without quote then Extract the downloaded SP Recovery
Flash Infinix 16+2 to the folder (Contains two files; recovery+Scatter File)
==>Step3: Create a
new Folder on your desktop name it “Sp Flashtool” without quote,
Extract the zip file of Sp Flashtool navigate to the folder you created earlier
“Sp Flashtool” on your desktop and extract it there.
==>Step4: Run Sp Flashtool as Administrator, it will pop
“no scatter file selected” click ok. Click on the Second bar where
you see Scatter-Loading browse where you extracted SP Recovery Flash Infinix
==>Step5: 16+2 open the folder named ” Infinix
CWM” and select the scatter file. ==> Lauch it and Click Normal wait it will update your binaries and
then ask to reboot
==>Step6: Turn Off your phone and wait for like 30secs
and Hit the Download then plug your Infinix back to the Pc. When you see the
red link you’re good but it dint display, check your drivers to confirm if you
installed the one meant for your phone.. After the Yellow Link shows, and OK
sign, unplug your device.
==>Step7: Now Hold the Vol Upand Power button for 5 seconds, when you see
Infinix on your screen, release the power button while you are still holding the Volume Up button.
Your Recovery will display and you’ll see something like Reboot system now (see the image below)
==>Step8: Choose install zip from sdcard- to Choose zip from
sdcard use vol up and down scroll up and down then choose the Update Supersu file from the root of your sdcard. Scroll to yes and
install, after a successful installing go back and reboot. Open Playstore
Search for SuperSu it has # round triangle icon then update the SuperSu App
==> Step9: Lauch it and Click Normal wait it will update your
binaries and then ask to reboot
Now your Infinix Zero 16GB has been successfully rooted. Go straight to Google Playstore and download root checker to verify your root status. Don’t be left in isolation, ask your questions.
Android
is great, but sometimes, the version you get with your phone—whether
its vanilla Android or something like Samsung's TouchWiz—leaves a bit
to be desired. Here's how to install a new version of Android (or ROM)
on your device for an even better Android experience.
What's a ROM?
One
of the best things about the openness of the Android platform is
that if you're unhappy with the stock OS, you can install one of many
modified versions of Android (called ROMs) on your device. A new ROM can
bring you the latest version of Android before your manufacturer does,
or it can replace your manufacturer-modded version of Android with a
clean, stock version. Or, it can take your existing version and just
beef it up with awesome new features—it's up to you.
If you're familiar with Linux, it's sort of similar to installing a different Linux distribution. Each version of the OS has a
specific goal in mind, and as such differs quite a bit from the others.
Which one you choose is dependent on your priorities and how you use the
device. You'll need to unlock your bootloader and flash a custom recovery (more info on that here), but once you get the hang of it, it's not too difficult.
There are a lot of different ROMs out there, and if you're looking for a place to start, check out our list of the five most popular. You can also check out this amazing chart which compares a ton of ROMs feature-by-feature, which is a great way to find the right one for you. Even if you have a Nexus phone with pure stock Android, ROMs are a great way to add new features and conveniences to Android.
Note:
We originally wrote this guide in 2010, but things have changed quite a
bit, so we figured it's time to revisit the process. Many of you Android
vets already know how to do this, but hopefully newcomers will find this
guide valuable—and maybe even you veterans will learn a thing or two.
Let's begin!
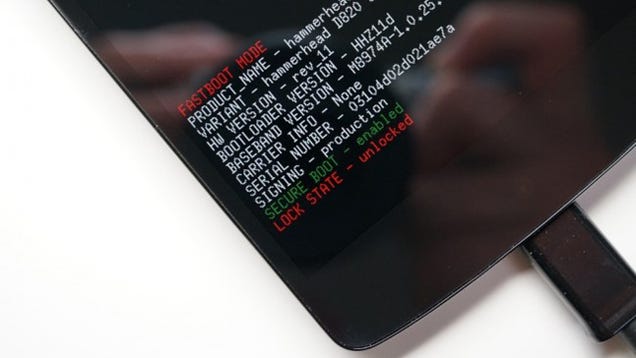
Step One: Unlock Your Bootloader and Flash a Custom Recovery
First,
let's clear up some confusion: Contrary to popular belief, you do not
actually need to root your phone to flash a ROM—you just need to unlock
your bootloader and flash a custom recovery. However, this process
usually goes hand-in-hand with rooting—and most custom ROMs come with
root access—so what you think of as "rooting your phone" is probably
what you're going to have to do first.
Unfortunately, we can't go through this step in detail here, because it's different for every phone! So, I highly recommend checking out our everything root guide
to learn a bit more about what's involved, what all the different terms
mean, and what to watch out for. Then, search around sites like XDA
Developers for instructions on how to unlock the bootloader of your
specific phone, which recovery you should use (usually TWRP or ClockworkMod), and how to flash it.
I
also recommend rooting your phone during step one, since it'll make the
backup process in step two easier—and save you some hassle along the
way. A lot of methods and one-click apps will root your phone anyways,
so it might be included in the process. Again, this can vary from phone
to phone. (If the instructions require you to flash SuperSU.zip, you can
refer to step three of this guide for info on how to do
that—ironically, it's just like flashing a ROM).
NOTE:
Unlocking your bootloader will most likely wipe your phone, and without
root access, you won't be able to back up very much. So, save anything
you want to keep on your computer—you will have to set up your phone
from scratch just this once before continuing.
When you're done, return here and continue to step two for the rest of the ROMming process.
Step Two: Make a Backup of Your System, Apps, and Data
Now that you've got a custom recovery on your phone, the first thing you should do—before you ever
make a big change to your system—is back it up. First, we'll make a
Nandroid backup, which is basically a image of your current system. That
way, if something goes wrong, you can restore your phone to exactly
the way it was before you started tweaking. This will save you a lot of
hassle if something goes wonky (which, let's be honest, can happen
often). To do this:
Reboot your phone and enter recovery mode. This is a bit different
on every phone, but usually involves some permutation of pressing the
power and volume buttons at the same time.
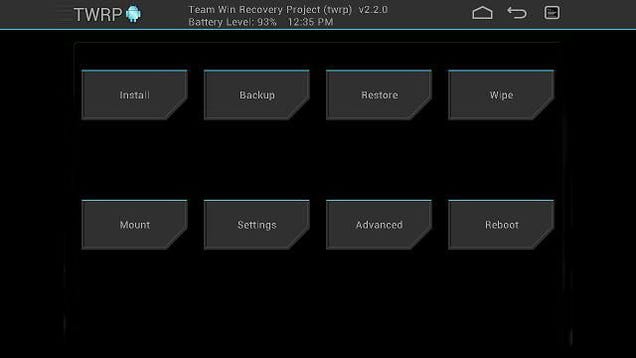
Head to the "Backup"
or "Nandroid" section of your recovery mode. The default settings should
be fine. If given the option, give your backup a name that helps you
remember what it is (like "Pre-CyanogenMod Backup 01-17-14"). Confirm
your backup and let it run.
Wait for the backup to finish. This may take awhile.
I also
recommend making a second type of backup: your
apps and settings. If you just unlocked your bootloader and wiped your
phone, you can skip this step, but any time you flash a ROM in the
future, you'll want to back up your apps first, since you may have to
wipe your phone before you flash. With a backup, you can easily restore
those apps and data after flashing, making the process a lot simpler. We recommend using Titanium Backup.
This
is different from a Nandroid backup because it just backs up the apps
themselves, which you can then restore on any ROM you want. Nandroid
backups take your entire system as it is, ROM included.
Note that
you'll need to be rooted to use Titanium Backup (which is why I
recommend you root in step one). To perform a backup in Titanium:
Open Titanium Backup and grant it root permissions if it asks for
them. If it experiences any problems with root, it'll tell you right
now.
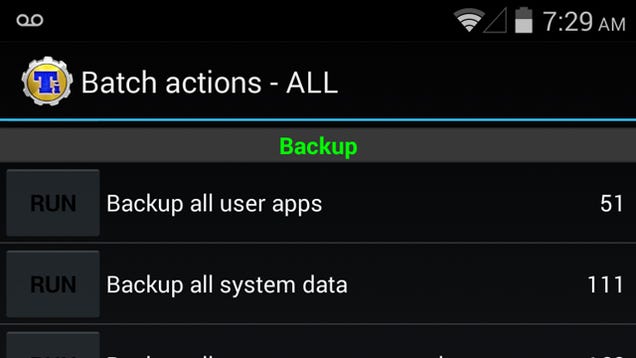
Tap the "Batch" button in the upper right-hand corner (the
one that looks like a little checkbox). Scroll down to the "Backup"
section and find "Backup All User Apps." Tap the "Run" button. This will
back up any apps you've downloaded from the Play Store, and their data.
(You can try backing up your system data as well, but I find this
usually doesn't work very well).
Wait for it to finish. If you like, you can also sync these to Dropbox as described here, but you don't have to for this process.
This
may seem like a lot of unnecessary backups, but trust me: it's going to
save you a lot of time in the long run. Now if something goes wrong,
you have a nandroid backup to fall back on and don't have to start from
scratch. And, when your ROM flashes successfully, you don't have to
start re-downloading and setting up all your apps yourself because you
can restore them with Titanium.
Step Three: Download and Flash the ROM of Your Choice
When
you've found a ROM you want to try, download it and save it to your
phone. It should come in the form of a fairly large ZIP file, so you'll
probably want to be on Wi-Fi to download it. You can either download it
directly from your phone, or download it on your computer and transfer
it over via USB.
To flash your ROM:
Reboot your phone into Recovery mode, just like we did back when we made our Nandroid backup.
Head to the "Install" or "Install ZIP from SD Card" section of your recovery.
Navigate to the ZIP file you downloaded earlier, and select it from the list to flash it.
Wait for the process to complete; it may take a few minutes.
Depending
on your situation (see below), you may also need to wipe your data
and/or cache. In TWRP, you'll find this under the "Wipe" section, and in
ClockworkMod, you'll need to either choose the "Wipe Data/Factory
Reset" option or the "Wipe Cache Partition" option. When you're done,
you're free to reboot into your new ROM.
So, when should you wipe your data and cache? Here are a few general guidelines:
If you're flashing a ROM different than the one you're currently
running, you should wipe data and cache. Essentially, this performs a
factory reset on your phone, and you will lose all your data.
If
you're flashing a new version of a ROM you're already running, we
recommend wiping your data and cache—but you should be able to get away
with just wiping the cache, meaning you get to keep all your apps and
settings.
Remember, if you backed everything up with
Titanium, then doing a factory reset isn't all that bad, since you can
just restore most of it. Keep in mind that even if you're just upgrading
your existing ROM, factory resets can be helpful.
If you only wipe your cache, note that a few apps may run into issues,
but reinstalling them or wiping that app's data usually fixes the
problem.
When you reboot, you should be in your shiny new ROM,
ready to play! But what? There's no Play Store? Read on for the last
step of the process...
Step Four: Download and Flash Google Apps
Because
Google's apps are not open source, custom ROMs can't bundle Google's
apps—like Gmail, Hangouts, or the Play Store—with their ROMs. That
means you'll need to download and flash them separately. Luckily, this
is pretty easy to do: just head to this page on RootzWiki to find out which ZIP file you need, download it to your phone, and flash it just like you did the ROM in step three. Gapps Manager is also a great app that'll help you find the right package if you're stuck, and you can download the APK from XDA Developers.
Once
you've flashed the latest Google Apps package, you should be all set!
You'll have a new ROM with tons of settings to play with, the Play Store
to download new apps, and—if you made a backup with Titanium—you can
now head into Titanium Backup and restore all your apps and their
settings. Enjoy!!